
 Kia Sorento: Inspection
Front Door Lock Actuator
| 1. |
Remove the front door trim.
(Refer to Body - "Front door")
|
| 2. |
Remove the front door module.
(Refer to Body - "Front door")
|
| 3. |
Disconnect the connectors from the actuator.
|
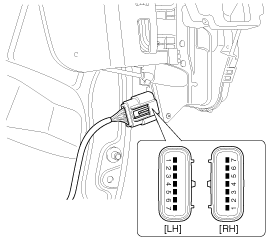
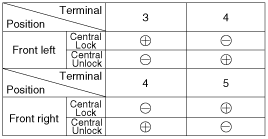
| 4. |
Check actuator operation by connecting power and ground according
to the table. To prevent damage to the actuator, apply battery voltage
only momentarily.
|
Rear Door Lock Actuator
| 1. |
Remove the rear door trim.
(Refer to Body - "Rear door")
|
| 2. |
Remove the rear door module.
(Refer to Body - "Rear door")
|
| 3. |
Disconnect the connectors from the actuator.
|
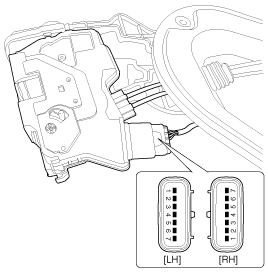
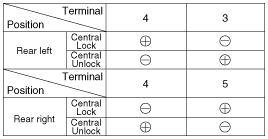
| 4. |
Check actuator operation by connecting power and ground according
to the table. To prevent damage to the actuator, apply battery voltage
only momentarily.
|
Tailgate Lock Actuator Inspection
| 1. |
Remove the tailgate trim.
(Refer to Body - "Tailgate")
|
| 2. |
Disconnect the 4P connector from the actuator.
|
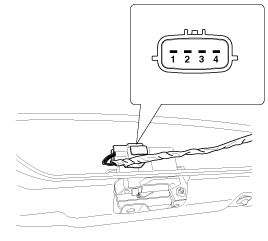
| 3. |
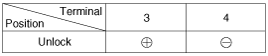
Check actuator operation by connecting power and ground according
to the table. To prevent damage to the actuator, apply battery voltage
only momentarily.
|
Front Door Lock Switch
| 1. |
Remove the front door trim.
(Refer to Body - "Front door")
|
| 2. |
Remove the front door module.
(Refer to Body - "Front door")
|
| 3. |
Disconnect the connectors from the actuator.
|
| 4. |
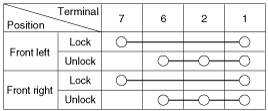
Check for continuity between the terminals in each switch position
when inserting the key into the door according to the table.
|
Rear Door Lock Switch
| 1. |
Remove the rear door trim.
(Refer to Body - "Rear door")
|
| 2. |
Remove the rear door module.
(Refer to Body - "Rear door")
|
| 3. |
Disconnect the connectors from the actuator.
|
| 4. |
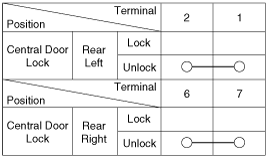
Check for continuity between the terminals in each switch position
according to the table.
|
Tailgate Switch
| 1. |
Remove the tailgate trim.
(Refer to Body - "Tailgate")
|
| 2. |
Disconnect the 4P connector from the actuator.
|
| 3. |
Check for continuity between the terminals in each switch position
according to the table.
|
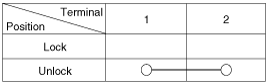
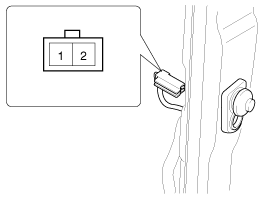
Door Switch
Remove the door switch and check for continuity between the terminals.
Hood Switch
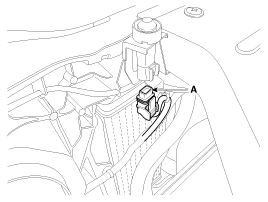
| 1. |
Disconnect the connector (A) and bolt from the hood switch.
|
| 2. |
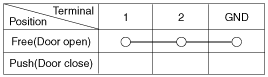
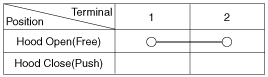
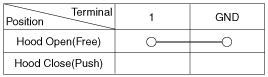
Check for continuity between the terminals and ground according
to the table.
[2P Connector]
[1P Connector]
|
Burglar Horn
| 1. |
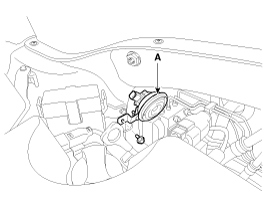
Remove the burglar horn after removing a bolt and disconnect the
2P connector from the burglar horn.
|
| 2. |
Test the burglar horn by connecting battery power to the terminal
1 and ground the terminal 2.
|
| 3. |
The burglar horn should make a sound. If the burglar horn fails
to make a sound replace it.
|
Burglar Alarm State [B/A State]
B/A State
Description
DISARM
1.
In "DISARM" state, no vehicle start inhibition. So, when
...
 Description
1.
Check that the red light flickers when the door lock or unlock
button is pressed on the transmitter.
2.
Remove the battery (A) and check voltage if...
 Transmitter Inspection
See also:
Antenna Installation
1.
Connect the roof antenna cables and connectors.
2.
Install the rear roof trim.
...
Gasoline Particulate Filter (GPF) Pressure Sensor Specifications
Specification
Item
Specification
Rated voltage (V)
5
Supply voltage (V)
...
Special driving conditions
Hazardous driving conditions
When hazardous driving conditions are encountered such as water, snow, ice, mud,
sand, or similar hazards, follow these suggestions:
Drive cautiously and allow extra ...
Manuals list
- Kia Sorento MQ4 2021-2026 Owners Manual
- Kia Sorento XM 2011-2015 Owners Manual
- Kia Sorento XM 2011-2015 Service Manual

Copyright © xm.ksmanual.com 2014-2026 - 0.0638