
 Kia Sorento: Timing Chain Removal
Kia Sorento (XM, 2011-2015) Service Manual / Engine Mechanical System / Timing System / Timing Chain Removal
| 1. |
Remove the cylinder head cover.
(Refer to Cylinder Head Assembly - "Cylinder Head Cover")
|
| 2. |
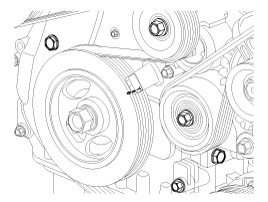
Turn the crankshaft pulley and align its groove with the timing mark
of the timing chain cover to set the piston of No.1 cylinder to the
top dead center on compression stroke.
|
| 3. |
Remove the timing chain cover.
(Refer to Timing System - "Timing Chain Cover")
|
| 4. |
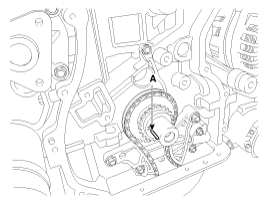
Make sure that the key (A) of crankshaft is aligned with the mating
surface of main bearing cap. As a result of this, the piston of No.1
cylinder is placed at the top dead center on compression stroke.
|
| 5. |
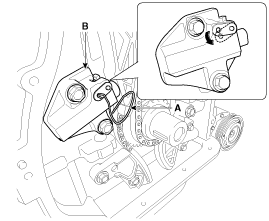
Release the ratchet by pulling the link down using a thin rod. Compress
the piston and then insert a stopper pin (A) into the hole on the ratchet
to hold the compressed piston. Remove the timing chain tensioner (B).
|
| 6. |
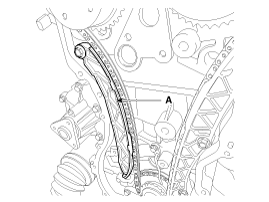
Remove the timing chain tensioner arm (A).
|
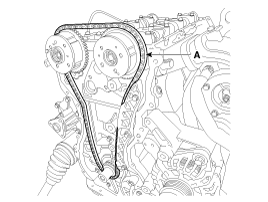
| 7. |
Remove the timing chain (A).
|
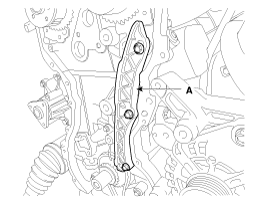
| 8. |
Remove the timing chain guide (A).
|
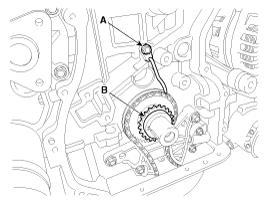
| 9. |
Remove the timing chain oil jet (A) and the crankshaft chain sprocket
(B).
|
| 10. |
Remove the balance shaft chain.
(Refer to Lubrication system - "Balance Shaft & Oil Pump")
|
1. Timing chain
2. Timing chain guide
3. Timing chain tension arm
4. Timing chain tension
5. Balance shaft chain
6. Balance shaft chain tension arm
7. Balance shaft chain tension...
 Timing Chain Components
Sprockets, Hydraulic Tensioner, Chain Guide, Tensioner Arm, Timing Chain
1.
Check the CVVT sprocket, crankshaft sprocket teeth for abnormal wear,
cracks or damage. Replace...
 Timing Chain Inspection
See also:
This device complies with Part 15 of the FCC rules.
Operation of the onboard wireless monitoring modules is strictly subject to the following two governing conditions:
This device may not cause harmful electroma ...
Coolant Refilling And Bleeding
Never remove the radiator cap when the engine is hot. Serious scalding
could be caused by hot fluid under high pressure ...
Front Fog Lamps Installation
1.
Install the front fog lamp bulb.
2.
Connect the fog lamp connector.
3.
Install the front tire wheel guard.
...
Manuals list
- Kia Sorento MQ4 2021-2026 Owners Manual
- Kia Sorento XM 2011-2015 Owners Manual
- Kia Sorento XM 2011-2015 Service Manual

Copyright © xm.ksmanual.com 2014-2026 - 0.0351