
 Kia Sorento: Parking Brake Assembly Installation
Kia Sorento (XM, 2011-2015) Service Manual / Brake System / Parking Brake System / Parking Brake Assembly Installation
Parking Brake Shoe
| 1. |
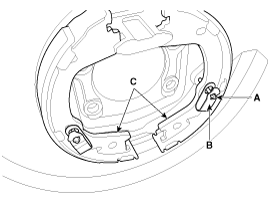
Install the shoe hold down pin (A) and spring (B) by pressing
and rotating the spring.
|
| 2. |
Install the operating lever assembly (D) and the upper return
spring (C).
|

| 3. |
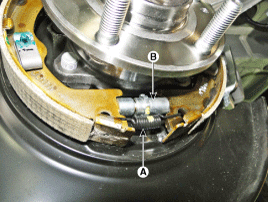
Install the adjuster assembly (B) and the lower return spring
(A).
|
| 4. |
Install the hub assembly.
(Refer to Drive shaft and axle - "Rear hub - carrier")
|
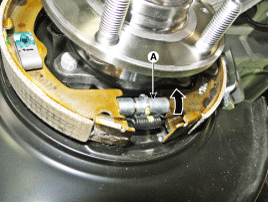
| 5. |
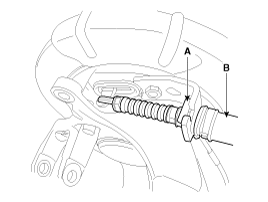
Install the parking brake cable (B), and then install the fixing
clip (A).
|
| 6. |
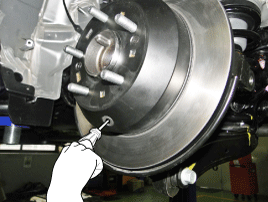
Install the rear brake disc, then adjust the rear brake shoe clearance.
|
| 7. |
Install the brake caliper assembly.
(Refer to Brake system - "Rear disc brake")
|
| 8. |
Install the tire and wheel, after installing the plug on the disc.
|
| 9. |
If the parking brake shoe or the brake disc are replaced a newly
one, perform the brake shoe bed-in procedure.
|

Parking Brake Shoe
1.
Raise the vehicle, and make sure it is securely supported.
2.
Remove the rear tire and wheel.
3.
...
 Parking Brake Assembly Removal
The parking brake cables must not be bent or distorted. This will
lead to stiff operation and premature failure.
1.
...
 Parking Brake Lever Assembly Removal
See also:
Transmitter Code Registration (Using GDS)
1.
Connect the DLC cable of GDS to the data link connector (16 pins)
in driver side crash pad lower panel, turn the power on GDS.
2.
...
Removal
1.
Turn the ignition switch OFF and disconnect the battery negative
(-) cable.
2.
Lift the vehicle.
3.
Dis ...
Automatic-dimming Function
To protect your vision during nighttime driving, your mirror will automatically
dim upon detecting glare from the vehicles traveling behind you. The auto-dimming
function can be controlled by ...
Manuals list
- Kia Sorento MQ4 2021-2026 Owners Manual
- Kia Sorento XM 2011-2015 Owners Manual
- Kia Sorento XM 2011-2015 Service Manual

Copyright © xm.ksmanual.com 2014-2026 - 0.0444