
 Kia Sorento: Parking Brake Lever Assembly Adjustment
Kia Sorento (XM, 2011-2015) Service Manual / Brake System / Parking Brake System / Parking Brake Lever Assembly Adjustment
Parking Brake Lever Stroke Adjustment
| 1. |
Remove the floor console.
(Refer to Body - "Floor console")
|
| 2. |
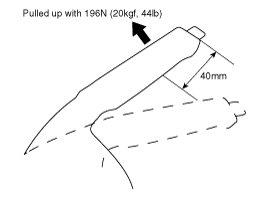
Apply the brake pedal 20 times with the force of 10kgf after bleeding.
Then, for the cable to settle in, apply the parking brake full stroke
more than 3 times.
|
| 3. |
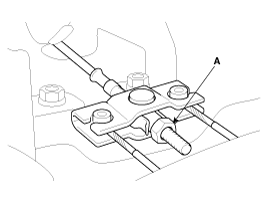
Install the parking brake cable adjuster, then adjust the parking
brake lever stroke by turning adjusting nut (A).
|

| 4. |
Release the parking brake lever fully, and check that parking
brakes do not drag when the rear wheels are turned. Readjust if necessary.
|
| 5. |
Make sure that the parking brakes are fully applied when the parking
brake lever is pulled up fully.
|
| 6. |
Install the floor console.
(Refer to Body - "Floor console")
|
1.
Install the parking brake lever assembly (A).
Tightening torque :
19.6 ~ 29.4 N.m (2.0 ~ 3.0 kgf.m, 14.5 ~ 21.7 lb-ft)
...
 Parking Brake Lever Assembly Installation
1.
Turn ignition switch OFF and disconnect the negative (-) battery
cable.
2.
Remove the crash pad lower panel.
(Refer to Body - "Crash ...
 Parking Brake Pedal Assembly Removal
See also:
Components and Components Location. Sunvisor Repair Procedures
Components and Components Location
Component
1. Sunvisor2. Assist Handle3. Personal Lamp
4. Cargo Lamp5. Roof Trim Assembly
...
Single-Use Parts
Single-Use Parts
Non-reusable parts (Single-Use Parts)
Workshop manual provides “Components and Components Location” which can be used to identify “Non-reusable ...
High Mounted stop lamp Removal
High Mounted Stop Lamp
1.
Disconnect the negative (-) battery terminal.
2.
Remove the tailgate trim.
(Refer to Body - " ...
Manuals list
- Kia Sorento MQ4 2021-2026 Owners Manual
- Kia Sorento XM 2011-2015 Owners Manual
- Kia Sorento XM 2011-2015 Service Manual

Copyright © xm.ksmanual.com 2014-2026 - 0.1256